061416-southern-wedding-party-confetti.jpg

wedding blog + planning guide for creative weddings | inspiration for DIY Brides

Brenda's Wedding Blog is your online resource for planning your dream elegant wedding. Helping you find the "wow" in weddings.

Posts in DIY
A Sneak Peek at my DIY Romantic Rose Wedding Collection

Tomorrow will be an exciting day for myself and my readers. I recently partnered with Anna Griffin and Xyron on a Blogger Design Challenge called Say “I DO” with Xyron and Anna Griffin. If you follow me on instagram, you likely saw the photo below {3 boxes arrived and were filled to the brim with goodies from Xyron and Anna Griffin - laminator, gorgeous cardstock papers, paper punches, dimensional stickers and so much more}. Well, be sure to come back tomorrow when I reveal my entire design for the design challenge which included a place card and menu {along with a few other designs I've created}. You will be able to vote for my designs and if I win, one of my readers will win the same exact AMAZING PACKAGE OF GOODIES worth $1,000 just for themselves!!!!

A Crafters Dream : 3 Big Boxes of Crafting Supplies from Xyron and Anna Griffin

Below is a quick little sneak peek of my place card design. I have so much more to share tomorrow on the blog. You won't want to miss this, it's going to be GREAT!!!!

A Red, White & Blue Bouquet + A DIY Vintage Americana Wedding

Before I share with you a holiday blast from the past - I have to share with you this festive patriotic bouquet from TheBouqs and it's only $40. You will receive Red, White, & Blue Roses shipped farm direct from an active volcano with Free Shipping. It's the perfect centerpiece or even bridal bouquet for  your festive 4th of July themed wedding or party.

Now, it's time for a gorgeous DIY holiday wedding, photographed by Rebecca Watkins Photography. This couple married on July 6th and their vintage Americana wedding was inspired by the Fourth of July and Kelly's grandfather {who had worked for Coca Cola for nearly 40 years}. Come see the entire wedding in the original post here

Free Wedding Invitation Printable : Peachy Keen Pouchette Invitation
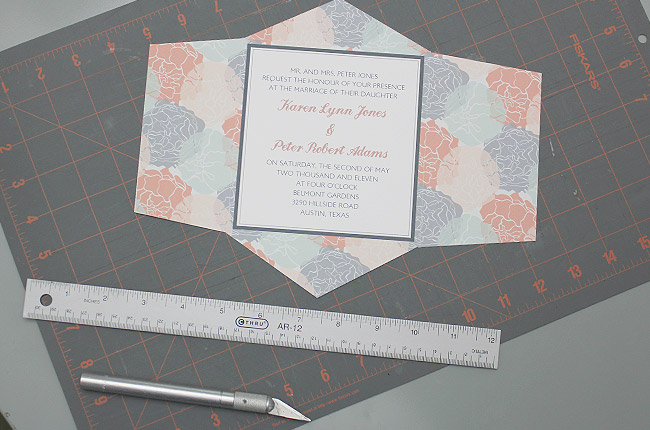
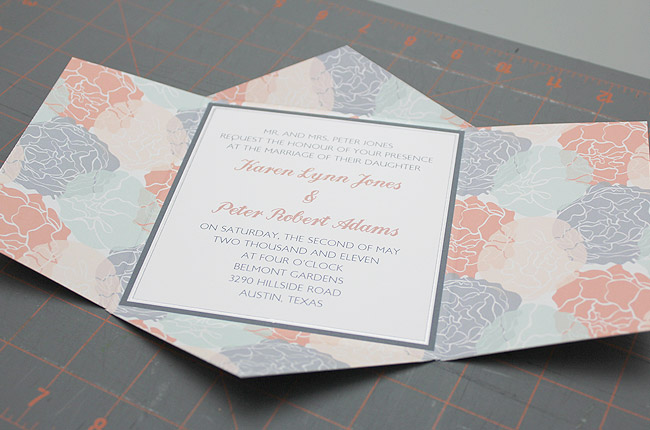
Hello everyone! I’m Anna Skye of Download & Print and I am thrilled to have Brenda invite me over to her blog with an exclusive printable wedding invitation template that I call Peachy Keen. First, if you are looking for a wedding invitation, huge congratulations on your upcoming nuptials! If you are planning a contemporary wedding but don't want to stray too far off the beaten path, this pouchette might pique your interest. The surprising color combination adds a modern spin to the classic pouchette shape.

The DIY steps are easy enough for even the most reluctant crafter to follow. Best of all, the finished product looks anything but DIY. I don't believe you have to compromise on quality or style when you choose to make it yourself.

Get the free Peachy Keen downloads here and follow along with the steps below to create this invitation for yourself.
Supplies:
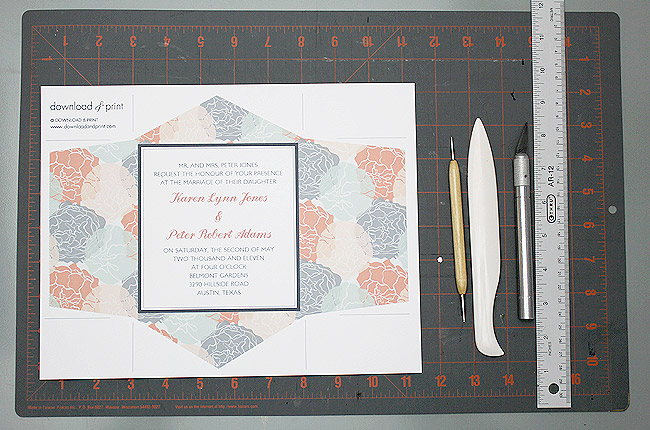
- Free printable templates {DOWNLOAD HERE}
- White card stock
- Printer
- Silver ribbon 7/8” wide, cut into approximately 18” lengths
- Bone Folder (optional)
- Scissors or X-acto knife and ruler (my preference)
- Silver sharpie (optional)

Step 1: Download and Print


Download the free Peachy Keen wedding invitation template files. Open the documents in MS Word and add your wedding details.

The fonts I used in the sample are London MM and Landliebe Script. You can download these fonts for free online, or use any fonts that you like. If you don’t have the sample fonts installed on your computer, Word will substitute different fonts.

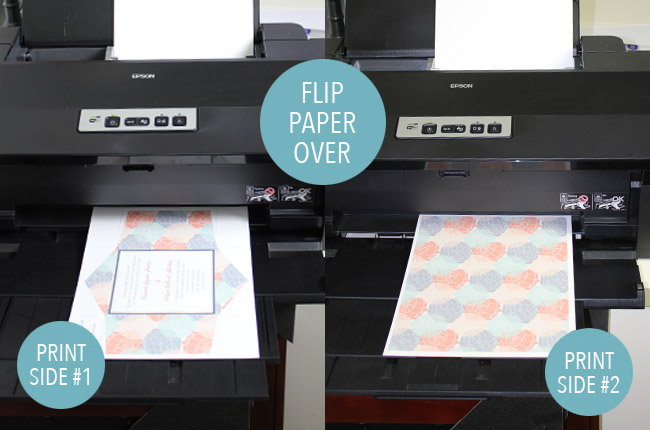
Print the first side of the pouchette, flip the paper over and print the back side.

Hint: 90 lb paper is the ideal weight for this project. A paper too light runs the risk of having the printing show through the other side. Anything too heavy and your printer may have trouble, and creating the creases becomes more work.

Step 2: Score


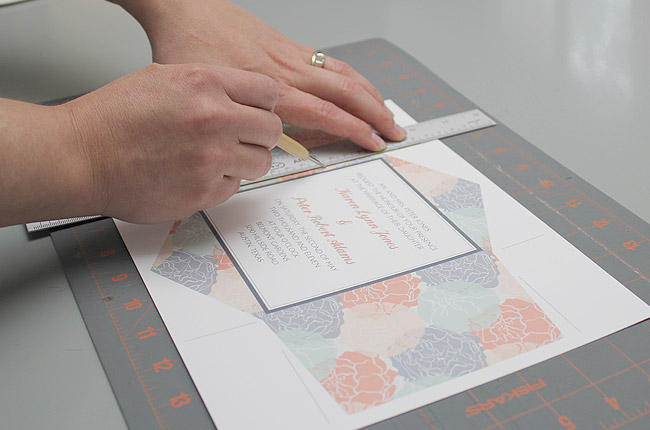
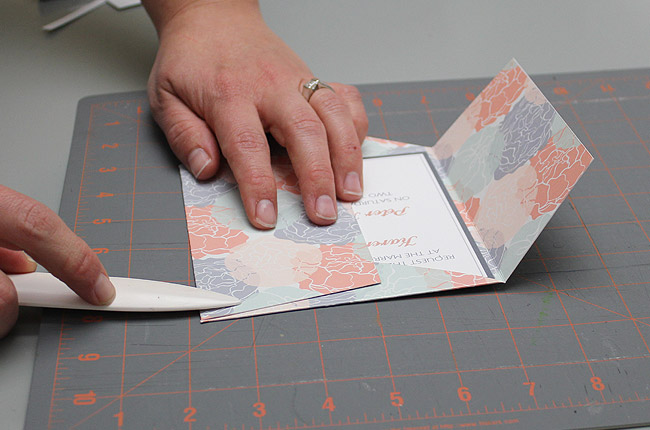
Using your bone folder, score along the fold lines, just outside the invitation square. This starts the crease and preps the paper for the steps to come.

Hint: If you don’t have a scoring tool, a closed mechanical pencil or back of your X-actor knife will work.

Step 3: Cut


I like to cut around the pouchette using an X-acto knife and ruler, but you can also use scissors.

If using an X-acto knife and ruler cut from the inverted points to the outside (i.e. from the corners of the invitation to the outside of the paper). This will make for sharper corners and you won’t run the risk of overstepping the cut mark.

Step 4: Fold


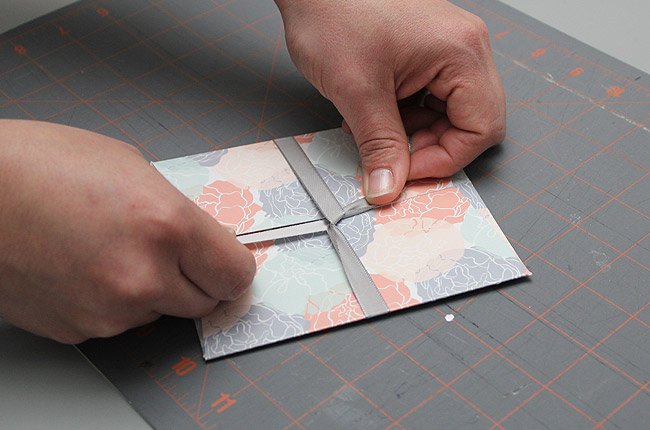
Fold in the pouchette flaps using the creases that you previously made. A bone folder will help you create sharp creases, or you can push on the fold firmly with the heel of your hand. The short flaps fold in first, followed by the medium flap, and the longest flap folds in last.

Optional Step 5: Silver Embellishment


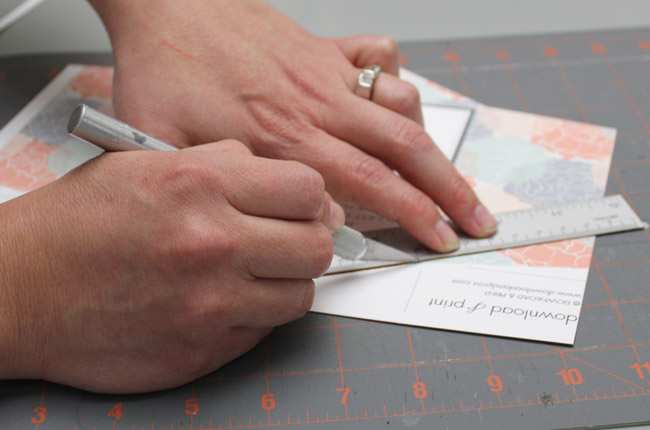
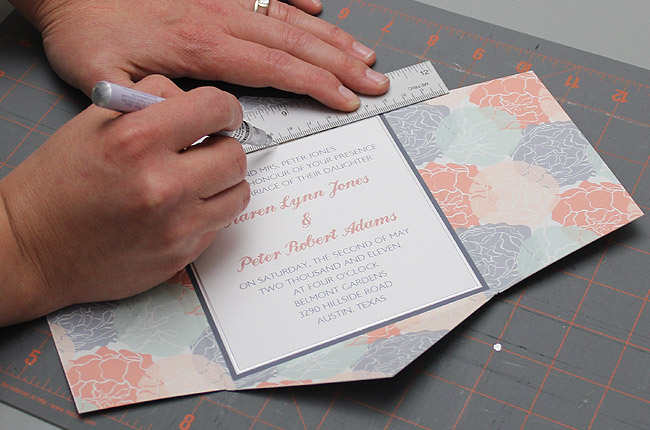
If you’d like to add a little sparkle to the invitation, trace the inner invitation border with a silver sharpie. The sharpie leaves a subtle sheen (Translation: Expensive metallic look!) to the pouchette.

Last Step: Seal and Mail


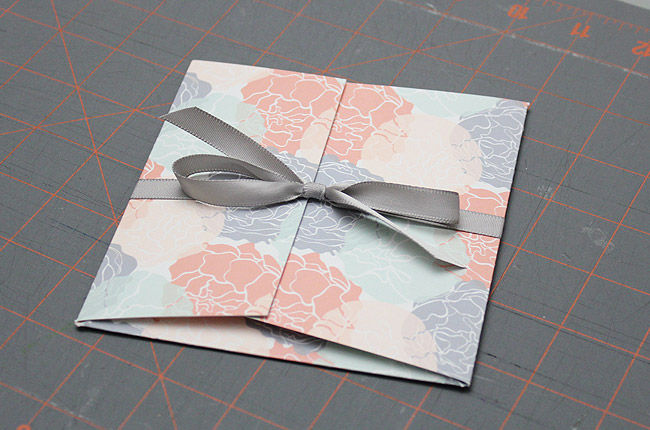
Tie a length of ribbon around the pouchette to keep it closed. Your invitations are now ready for stuffing into a 5.5” square envelope and mailing.

Hint: This entire process moves much quicker if you form an assembly line. Grab your maids, mom, and fiancé, your beverage of choice, and make an afternoon of it. Give each person a task. One person scores, one cuts, one folds, and one ties. I don’t recommend having your fiancé take the last step. In my experience, males just don’t tie pretty bows!
DIY Mini Fiesta Boxes with Fringe and Taco Bars for Weddings
Happy Cinco de Mayo! I have a fun DIY to start today's post with. I was recently sent several blank boxes from Pamela Smerker Designs and asked to put my craft skills to the test to see what I could come up with. Since I knew today was coming, I thought her petal favor boxes {which come undecorated or with patterns on them} was the perfect starting point for my Mini Fiesta Boxes. How cute would these be for guests at your next party of fiesta? Or maybe at your taco bar? {more on taco bars for weddings after the DIY}
To create this mini fiesta box, I used one of Pamela Smerker Designs' white petal box with crepe paper that I fringed with scissors and then glued around the sides of the box with glue stick, overlapping the colors. I then painted both sides of the petal flaps with matching colors. I lined the box with wax paper and placed in corn chips. It's now the perfect individual serving for your guests' chips to be dipped in guacamole or bean dip. This cute little "take-out box" of sorts, is perfect for today's Cinco de Mayo parties and especially perfect for taco bars at weddings and pre-wedding events. The colors can of course be changed to match your party.
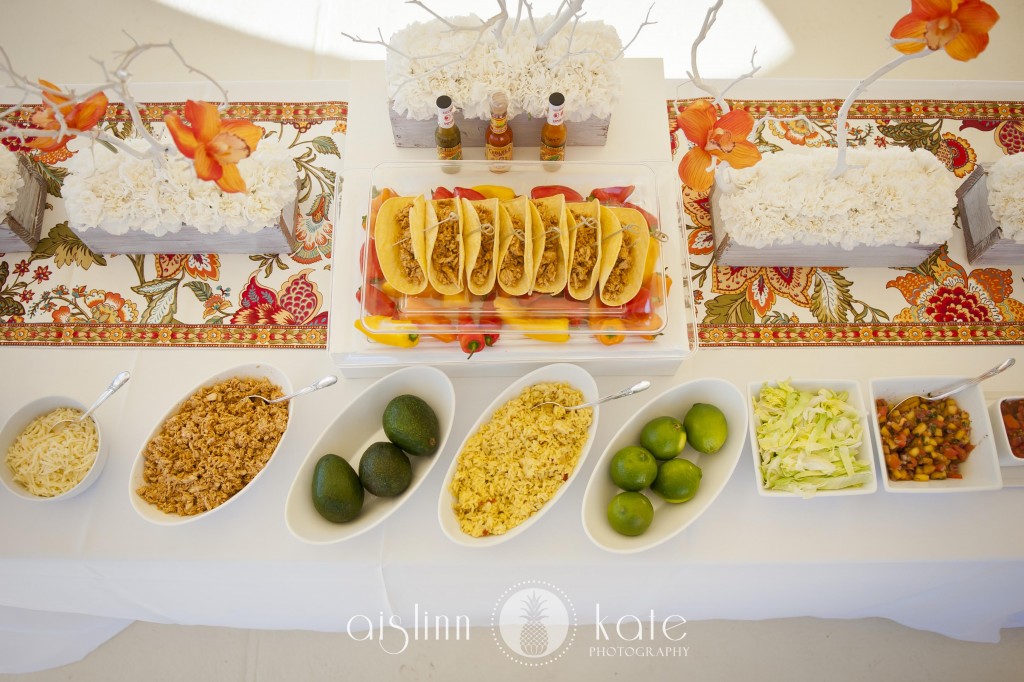
A perfect way to use these Fiesta Boxes is with a Taco Bar at your wedding. Wouldn't it look super cute to see a box like this filled with chips and decorated in your wedding colors waiting at your guests' place setting? What a fun way to bring color to the table. You could even have small bowls of bean dip and guacamole ready for immediate dipping at the center of the tables. And, then of course, a taco bar is the perfect reception solution. Check out this taco bar from a fiesta wedding styled shoot photographed by Aislinn Kate Photography . . .
Pom-Pom Stamped Bunny Tags : a Fun Last Minute Easter DIY

Now, I know this is a wedding blog - but I had so much fun working on this DIY project with my daughter this week that I wanted to share with you before the day ends. This idea can of course easily be swamped out with other imagery for any type of event - maybe an engagement ring with a rhinestone added for the diamond?

Pom-Pom Stamped Bunny Tags | DIY Tutorial at www.brendasweddingblog.com/blogs/2014/4/18/pom-pom-stamped-bunny-tags-a-fun-last-minute-easter-diy
Stamped Bunny Tag DIY Tutorial - using xyron glue dots and pom-poms | DIY on www.brendasweddingblog.com/blogs/2014/4/18/pom-pom-stamped-bunny-tags-a-fun-last-minute-easter-diy

Supplies:
- any bunny silhouette you like {I searched online for mine}
- x-acto knife
- paint brushes
- xyron glue dots {high-tack}
- acrylic paint {white, pink + black}
- small resin frames {I found mine in the $1 bin at a local craft store}
- pom-poms {I found mine in the $1 bin at Target}
- patterned scrapbook paper of your choice

Stamped Bunny Tag DIY Tutorial - using paint, xyron glue dots + pom-poms | DIY on www.brendasweddingblog.com/blogs/2014/4/18/pom-pom-stamped-bunny-tags-a-fun-last-minute-easter-diy
Stamped Bunny Tag DIY Tutorial - using xyron glue dots | DIY on www.brendasweddingblog.com/blogs/2014/4/18/pom-pom-stamped-bunny-tags-a-fun-last-minute-easter-diy

I decided to go the framed route for my bunny {for our Easter place settings} - but these can easily be made into tented place cards, gift tags, cards - the ideas are endless. Simply cut out the bunny template your selected and you're left with an empty bunny - this becomes your stencil. Select the patterned paper of your choice and trim it to fit in your frame or whichever size tag you wish to make. For my frames, I cut off the outer plastic layer so the bunny could have a puffy cottontail. Simply stamp away on top of the cut-out bunny, covering the entire area in white. Slowly lift off the stencil {the darker the paper, the better the bunny will look}. Then I added in a pink nose, a little pink in the one ear and a black eye. I added a xyron glue dot where the tail would be and attached a pom-pom to it. The hold is super strong and there's no waiting for glue to dry with these dots. I placed the finished bunny in my frame and it's now the perfect finishing touch to our Easter Sunday dinner table at my parents house. I'm now off to make more . . . hoping everyone has a wonderful weekend. See you back here on Monday.

Stamped Bunny Tag with a pom-pom tail | DIY on www.brendasweddingblog.com/blogs/2014/4/18/pom-pom-stamped-bunny-tags-a-fun-last-minute-easter-diywww.brendasweddingblog.com

Disclaimer: Xyron provided free products for me to sample &
craft with, but all opinions and ideas are completely my own